
Introduction
I recently visited Black Linn Falls at the Hermitage in Perthshire to make this picture. In order to produce an image such as this, takes great physical effort and technical knowledge. In this series, I am going to explain what it takes to pull this off.
Plan
I knew that the milky way extended around to the south west direction in autumn in the northern hemisphere; this is what began the idea for the shot. I used ‘PhotoPills’ to give me a general idea of alignment, and Google Earth Pro. Photopills is a wasted opportunity to me. It gives some advice on alignment, however the VR function is pretty useless. It doesn’t allow the user to see the milky way (or object) over the landscape you are going to be shooting in, which is what we really want. It literally just randomly overlays it in your house in the VR mode that it has: not that useful, I mean, I don’t care what the milky way looks like over my television set, right? You have to physically go to the location to see what will be, which defeats the point when planning. I was in touch with the app maker about this two years ago to advise and they advised they where planning to do what I asked; implement the VR element over the shooting landscape, however that still has not surfaced as of it. To be honest, although I go with a rough plan, I am not a planner. I find it stifling and boring to have a rigid idea of what I want. Sometimes I never know what I want; but I know what I don’t want, image wise. The best app overall is ‘Planit Pro’. This is a subscription app with a per monthly payment, however it does just what I ask and need: it lets as see the landscape with the milky way overhead, and at different focal lengths.
The alignment of the milky way seemed to check out that at around midnight, whereby the southern milky way would align up over the falls. I arrived much earlier than this, in order to hike in, test equipment, and get ready to shoot.
Equipment
Star Adventurer 2i Star Tracker Mount
This is essential for any landscape astrophotographer to be able to capture the greatest, most detailed views of the cosmos. I always have this with me, every night. With an ultrawide angle lens of say 14mm, we can easily do 10 or more minute exposures. Even around 35-50mm, we can do multiple minutes of exposure easily without star trails showing up in our images.

Nikon Z8
I used a Nikon Z8 to capture the sky of this image. The Z8 has a very useful function that is also present in Sony land, whereby it allows us to see the starlight and landscape much better than in the past. Nikon call this ‘Starlight View’. When enabling this function, it assists physically seeing the scene, and enabling the shooter to focus. I used the Z8 to capture the sky frame on the Star Adventurer mount.

Nikon D810
I still use DSLR kit, because technically speaking there is absolutely nothing wrong with it. The images produced, will be exactly the same. The major reason I used it this evening, was because I had the Sigma 14/1.8 Art attached to it. Perfect for capturing the ultra dark foreground with the aperture collecting over double the amount of light that my 14-24/2.8 will.

Sigma 14mm 1.8 Art
The Sigma 14/1.8 is a lens I still use regularly, particularly during large auroral displays, but also in other situations like here. In this particular case, I used it for collect the foreground scene, using the f/1.8 aperture. At f/1.8, this lens is sharp enough to collect a scene like this when shooting wide open. It took ten minutes of exposure to begin to register the foreground at ISO 800! Any fall off in sharpness in the corners is fine, we don’t want to be directing the viewer into the corners of the image, etc.

Nikon 14-24/2.8S
I used the Nikkor natively on the Z8 body of course. This allowed me to achieve excellent quality starlight at 14mm. I have no qualms using the 14mm Sigma to do this either despite the higher astigmatism and coma that it has wide open, however as I will explain later, this was about streamlining the shot and time it took to make it.
Other Stuff
I use a Gitzo Mountaineer series carbon fibre tripod and a Manfrotto 055 aluminium tripod with the star adventurer mount. I do not use remote timers (more on this soon), and on the Z8 enables selection of predetermined exposure times in body which is helpful also. I use L brackets on all my cameras for astrophotography and landscape photography. I am using a Smallrig L bracket on my Z8, for example. The reason I do so, is that it place the centre of gravity right over the tracker when using the camera vertically.
Arriving on Scene Setup
Upon arrival, I checked out the best possible area to shoot and went about polar aligning the Star Adventurer tracker. I then arrived at a composition that I wanted to show and fitted my D810 with the 14mm f/1.8 Sigma lens. I was then fixed in place after this, by design. I dropped the monitor down to about minus 3 to protect some night vision and also to allow me to judge exposure better (with histogram enabled of course). I enabled long exposure noise reduction in camera. This takes a black frame of the corresponding time of the initial exposure and subtracts it in camera, meaning it cancels out most of hot pixels that can show themselves over an ultra long exposure time such as used for this shot (ten minutes). After composing, I focused and then put the camera to timed mode (not bulb or 30 seconds). Bulb is useless unless we use remotes, and I personally hate using remotes at night in this day and age, and 30 seconds was going to be no where near long enough exposure time to make the shot. Timed mode allows us to use exposure delay mode, which I enabled, then after we push the shutter, the exposure proceeds until we press the shutter again. You might think that would cause problems with shake, however I have never found that and others will confirm that this is the case. As long as we carefully roll a finger over the shutter to end the exposure, you will obtain a sharp picture. This is a liberating way of working, freeing us of using pesky remotes in the dark. After selecting mirror-up mode in combination with exposure delay, I began the exposure in manual mode. My settings where as follows - aperture of f/1.8, exposure time would be 10 minutes, with an ISO of 800. I set my watch for 10 minutes and after that time passed, I pushed the shutter button again. The camera then switched into long exposure noise reduction mode, which means it was out of action for a further 10 minutes. A total of 20 minutes to take the foreground might sound excessive, or perhaps even ludacrous, however to do this to a high level is what it requires.
I then turned my attention to my other camera that I brought with me, the Nikon Z8. I mounted the Z8 to the Star Adventurer, enabled the red light mode, dropped the screen brightness, put the camera into manual mode and focused on the bright star Vega, which we can see on the right of the image. I turned on the star tracker, after confirming good polar alignment and set the exposure delay mode to 3s, manual mode, and selected 3 minutes at ISO 800. I nearly always select an ISO of 500-800 on the Z8, due to the dual gain point, which reduces read noise in the electronics whilst shooting. I kept the aperture at f/2.8 - the Nikon 14-24/2.8 is stellar at this focal length on starlight, stars remind round and decent quality right into the corners. I made sure I was at 14mm on the zoom ring. I now had obtained both the foreground and sky for the shot. Sometimes I will take three tracked sky shots and stack them, and this is a good way of doing things, however on this night I did not.
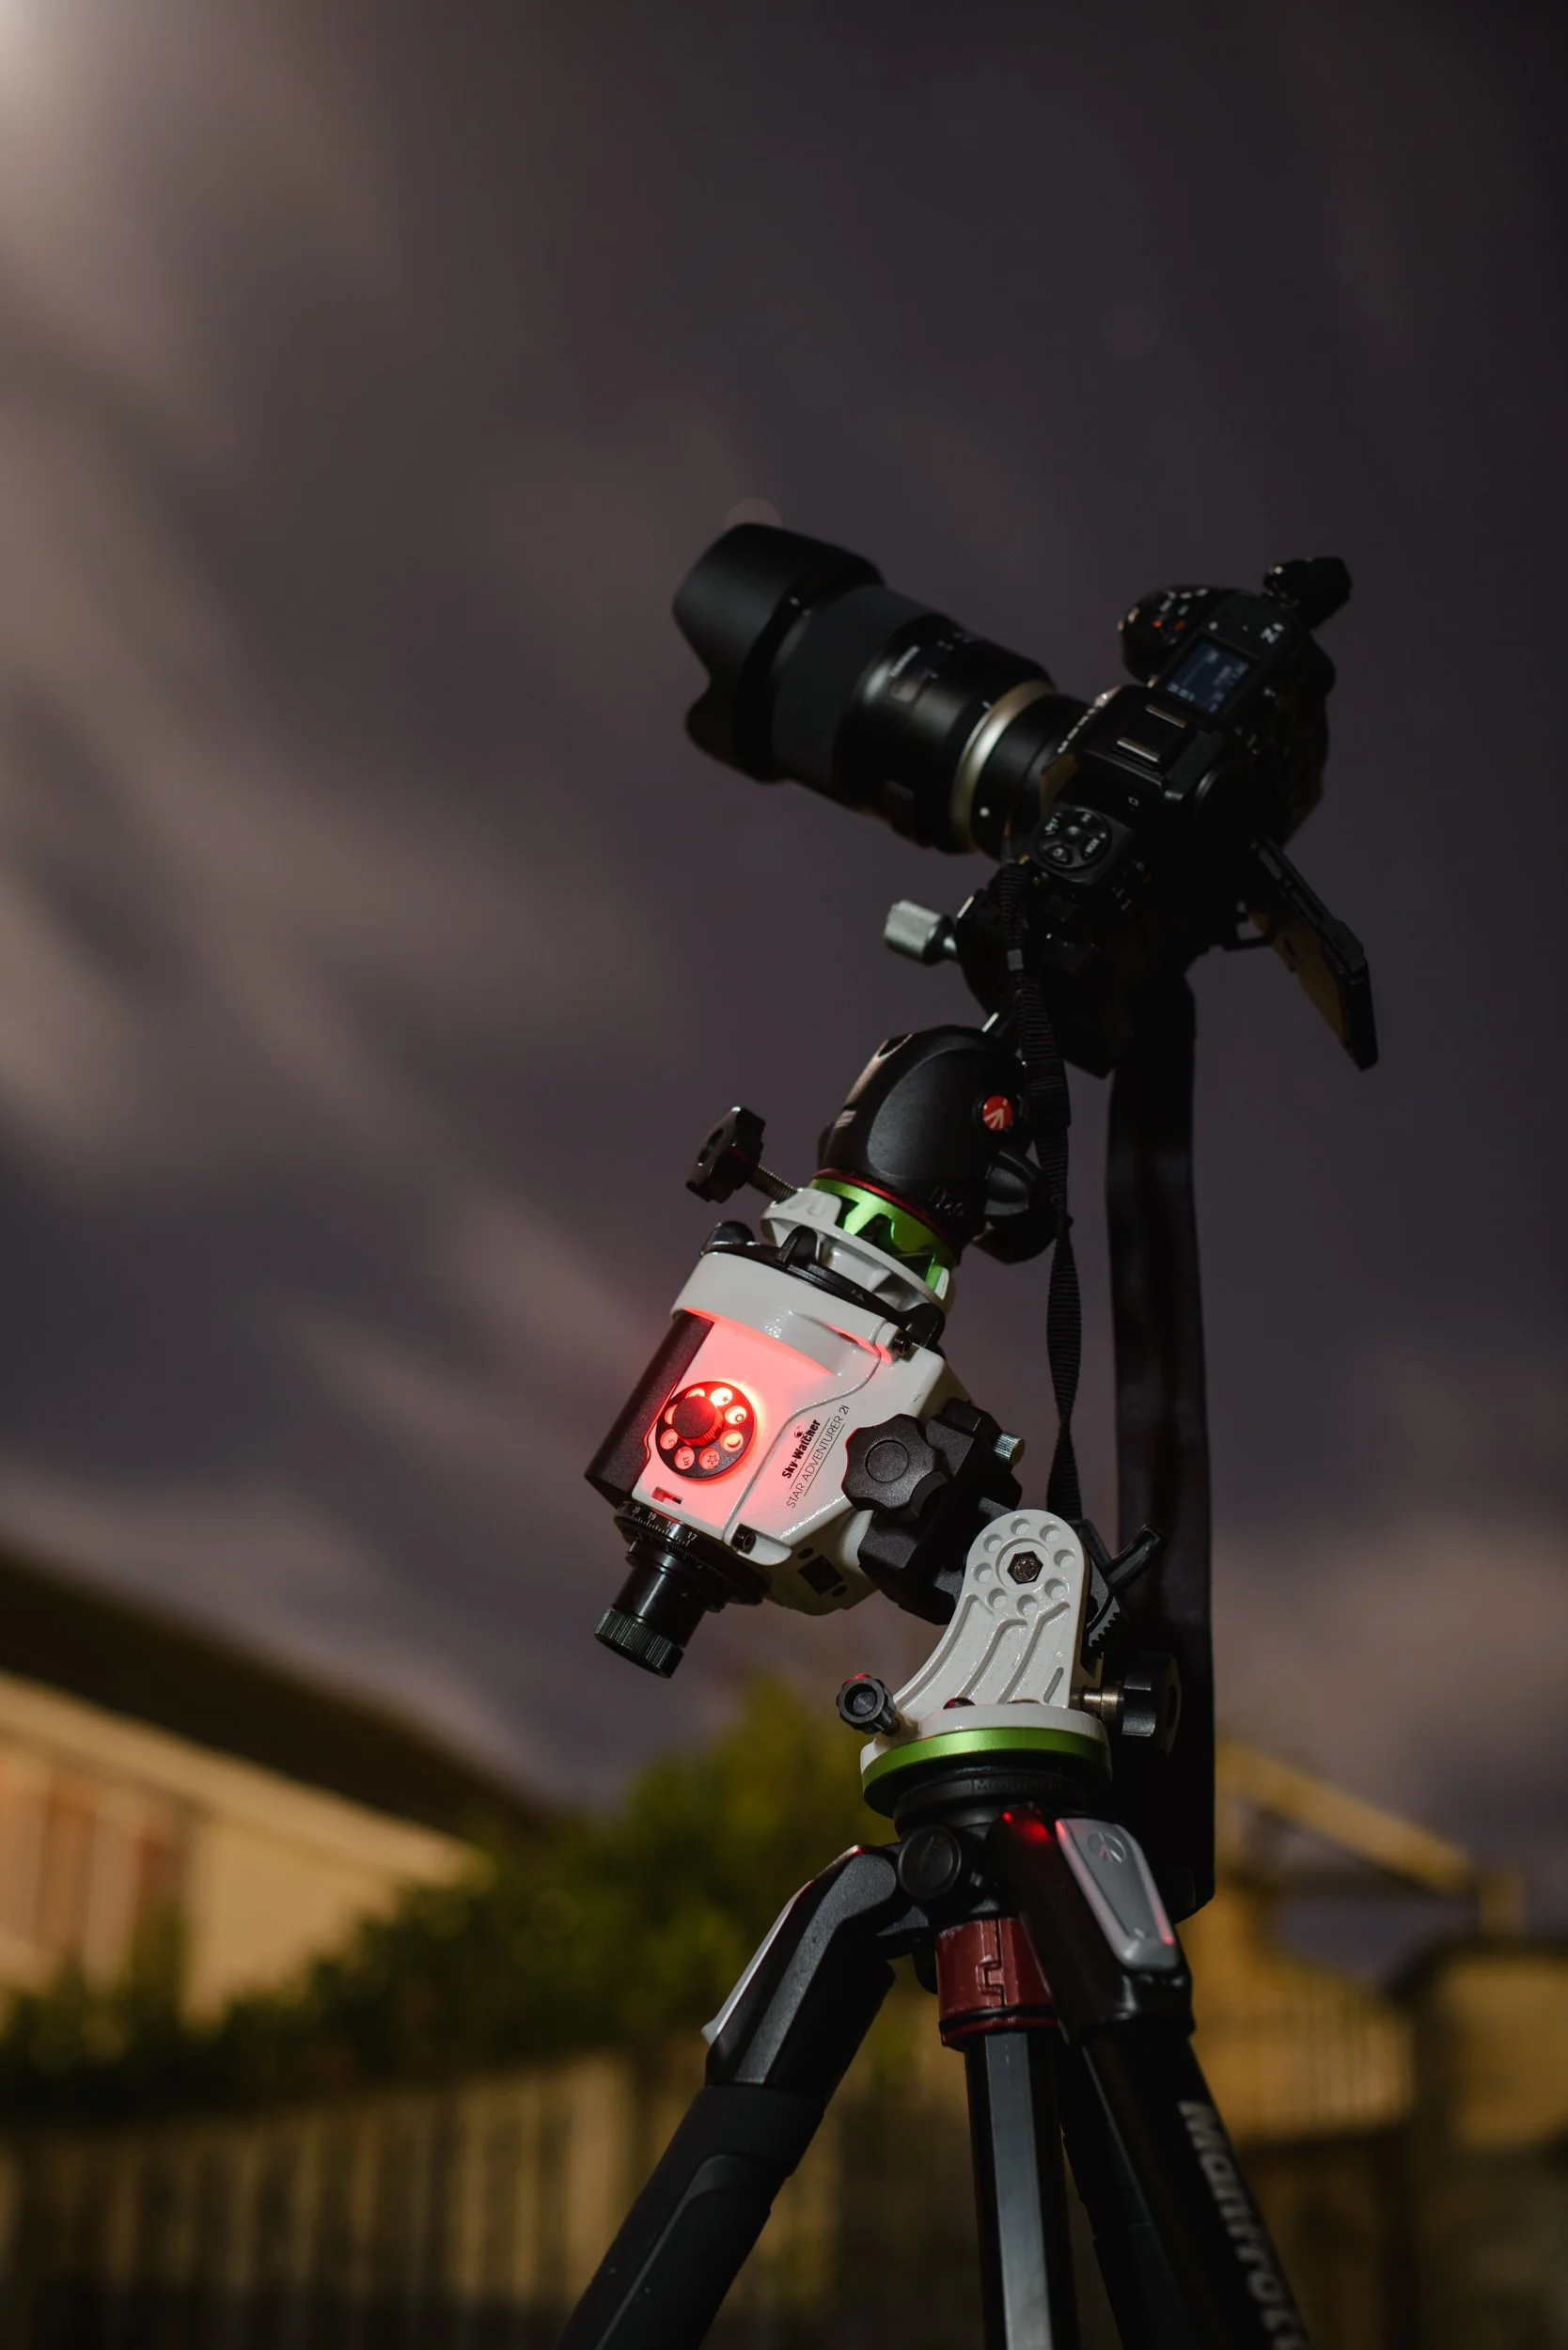
The venerable Sky Watcher Star Adventurer has helped me make most of my night sky pictures
Processing
Now the work really begins. And I do not say this lightly, or imply that this image is fake. I say this because, technically speaking, every night sky image is a composite, and potentially nearly every landscape image is that has contrasty light. Why? Well, because they nearly always require multiple exposures to get the best fidelity in the final picture. Even with a fast aperture lens, it is impossible to capture the night sky in high detail without doing multiple minutes of exposure. Try shooting the night sky with single shots, which means no long exposure foreground, and a short sky exposure. Let me save you time and tell you that the result is only pleasing at very small sizes, and sometimes not even at that. The night sky is a little light-starved!
Editing of the Tracked Sky Exposure
I tend to edit the sky exposure first, however it really doesn’t matter which way we do it. I tend to import the expsoure into Photoshop via a smart object and do some basic camera raw adjustments to it before I stretch it. To learn more about stretching, which is a whole topic in itself, see my other tutorial here. As I stretch the image, I feather the stretch off so that it impacts less on the horizon then at the mid portion and zenith of the sky. I do this because nine times out of ten we are dealing with some horizon light pollution, so we don’t want to brighten this in most instances. As I stretch, I select the stars and apply a colour preserving stretch. I split the stars and background from each other using StarXTerminator. This allows me to pull out the faint detail from this patch of the night sky which is much more subtle in it’s details than the milky way core is for example. Having the stars on one layer, and the background on another, lets me perform again, some basic camera raw global adjustments, further background stretching, and some colour / light pollution fixes before recombining the two. Before I do so, I can display the stars how I want them by applying a curve layer above the stars only layer and using a clipping mask in order to reveal more or less stars in the final result. I do not use minimum filters, as this produces bad artefacts even when done subtly, and this method works a hundred times better so I find it is now completely redundant.
I pull the file to reveal more than our eye sees (because our eyes see very little compared to what is possible). However, I like to stop before it becomes garrish, like we would expect a seasoned shooter to do in any other photographic discipline, for example Landscape Photography. I do not shoot with astro modded cameras for this reason. I believe that these images look very odd to the final viewer, especially if they are not astronomers or astrophotographers such as we are. The average person has no idea what nebulae are, and it often looks like a fake AI generated result to many. I want to avoid this as much as possible. I think these views of the cosmos belong in deep sky astrophotography, which I also enjoy. I leave these views for that. I am about editing to display the feeling, the twinkly dreamy night impression that I get when I am on location. I simply don’t think about the nebulae up there, for the most part, when doing these types of shot. Final steps include a final noise reduction, applied lightly using NoiseXTerminator. We shouldn’t need too much noise reduction if we have good data, and haven’t pulled it to riduclous levels (remember, that these things will bring out noise as we process).
Editing of the Foreground Exposure
To ensure realism, we need to make it that both of these pictures play together nicely. There are many points we should consider in order to do this. One of the major ones, is relative brightness. If you want the final result to look as natural and as real as possible, we much realise that the sky has to be brighter than the foreground and land below it. If the scene below is edited brighter than the sky, it is instantly un-natural, so tread carefully. Next is colour. We must ensure our white balances are the same, or at the very least show some semblance to one another. This is easily tackled in camera raw, before import, or when in Photoshop, which is where I edit this exposure also. Of course we can adjust the sky and foreground after recombining them in the next step, however it is best to get them as close as possible to how we want them before doing so. This will help prevent artefacts and halos at the places they intersect and are masked together. The foreground exposure is nearly always brightened in post using the exposure slider, curves, and selective white adjustment, often with some local masking. Be careful of using the shadow slider. Adjusting shadows upwards, will bring out noise extremely fast, even on ultra long exposures in dark places. Consider why you would want to brighten a shadow in a foreground? We do not want the viewer gazing into back shadows. I will usually do a curve adjustment and fade off the blacks at the left most side of the histogram. I do this, because it matches what our eyes see in shadows at night (barely nothing) but it prevents them going to clipped black, which most of the time you want to avoid as it can again, throw artefacts into the finished result. If there is a horizon I level it, if I find it is not sitting correctly. If there is distortion present on objects (perspective distortion, not lens distortion), I will sometimes correct this. I didn’t here. The tree on the right leans slightly (though admittedly, not as much as implied), however fixing this would have affected the bright star sitting by it - Vega, and it doesn’t really detract from the end result. Because I shot with long exposure noise reduction enabled, there are very few hot pixels to clean up, and the file should be clean provided a long enough exposure was used. The rule is, you think long is enough? Go longer…You can nearly never get enough exposure on the foreground, particulary in ultra dark sky locations - which stands to reason. After I get the file close to done I look to finish the image.
Combine and Finish
After saving both images independantly, I bring them both into Photoshop as smart objects. This is important, because it means that we can tweak them on the fly in camera raw, in order to make them blend correctly. We can make a selection of the land, then refine it in the select and mask workspace. We then apply it to the file. Often this will cause issues we need to fix. The most likely will be that haloing appears around objects where they both intersect on each other. This can be fixed by opening up the brighter exposure, and pulling down the highlights in camera raw, saving, then watching the intersection improve and the halo dissapate. For some images however, especially ones that involve ultra complex scene objects such as trees in my example, involve an even more complex masking solution. Enter Luminosity Masking, which is what I used here to recombine the images. This allows me to select the dark foreground and get finer control of the branches and leaves. We still have access to Adobe camera raw as long as we imported the files correctly, in order to adjust the files that will intersect one another in the mask to be able to produce a convincing, high quality result. I do not sharpen most of my work, other than the very light sharpning applied in camera raw, etc. I find digital images are too sharp out of the box mostly, and it is a look I want to avoid. Sharpning itself introduces halos and other problems also, which then takes steps to mitigate and clean up.
Final Thought
The total edit time for this shot is approximately three to four hours. That might sound absurd, however like I said before, this is generally what is often required to edit a complex scene to a high level of quality. Part of this time is also taken up by trying certain things that perhaps do not work so well, then going back in the workflow to try something better or different. Even despite my experience level with landscape astrophotography (and I’d imagine many other shooters too), it still isn’t a quick process. Rushing tends to not be advantageous to obtaining a good end result I fine.
I hope you have found this useful and please note I offer an editing service which includes the full photoshop file to be able to reconcile and understand each individual step, with email support for any questions as how to do something, or to ask questions on why I am doing something. Despite being for the most part completely self taught, the fastest way to learn something to a high level is to watch someone who is already doing it. I would have got where I am a lot faster than it took me!
If you enjoyed this article, consider following me on Instagram or Facebook.
Steve